Table of Contents
TABLE OF CONTENTS
Add a header to begin generating the table of contents

WooCommerce to Shopify Migration Checklist: A Quick Overview
Migrating from WooCommerce to Shopify can feel overwhelming, but with the right plan, it doesn’t have to be. This WooCommerce to Shopify Migration Checklist will help you to successfully transfer your WooCommerce store to Shopify without losing data, SEO rankings, or functionality.
- Who this guide is for:
- Store owners planning to migrate WooCommerce to Shopify on their own
- Businesses looking to switch from WooCommerce to Shopify for scalability and ease of use.
- Anyone who wants to avoid costly mistakes while migrating from WooCommerce to Shopify.
📌 What you’ll learn in this WooCommerce to Shopify Migration Checklist:
- How to import Shopify data from WooCommerce without errors.
- How to preserve SEO rankings and properly set up 301 redirects.
- Common mistakes to avoid and expert tips for a smooth WooCommerce Shopify migration.
Why Migrate from WooCommerce to Shopify?
WooCommerce is a flexible and customizable platform, but managing hosting, security, and updates can become overwhelming. Shopify provides an all-in-one solution, making it easier to scale your business without technical headaches.
Common Reasons Why WooCommerce Storeowners Migrate to Shopify:
- No need to manage hosting, backups, and security.
- Easier product management and built-in marketing tools.
- Shopify offers 24/7 customer support, while WooCommerce relies on third-party support.
- Shopify’s robust infrastructure prevents downtime and performance issues.
However, migrating WooCommerce to Shopify involves more than just moving data. You must also ensure that your products, customers, and SEO rankings remain intact. This checklist will help you make a seamless transition.
Step 1. Planning Your WooCommerce to Shopify Migration
Before you start the migration process, proper planning is essential to prevent data loss, minimize downtime, and ensure a smooth transition. A well-structured plan will help you identify what needs to be transferred, backed up, and reconfigured so that your Shopify store functions seamlessly after migration.
🔹 Assess Your Current WooCommerce Store
Before migrating, take inventory of your WooCommerce store and list everything that needs to be moved to Shopify. This will help prevent missing data and functionality gaps.
What to Include in Your WooCommerce to Shopify Migration Checklist:
- Products & Categories - Ensure all product descriptions, pricing, images, SKUs, and variations (sizes, colors, etc.) are accounted for.
- Customers & Orders – List all customers and past order histories to be imported.
- Blog Posts & Pages – Identify pages, FAQs, and blog posts that need to be transferred.
- WooCommerce Plugins & Features – Determine which features don’t have a Shopify equivalent and find suitable apps or workarounds.
How to Check Which WooCommerce Plugins Need Replacing?
Shopify has its own app ecosystem, meaning WooCommerce functionalities need replacements. Check if:
- Your WooCommerce plugins have Shopify alternatives (e.g., SEO, email marketing, upsells).
- You need to custom-code anything that Shopify doesn’t offer natively.
- Any custom features require a developer to recreate them in Shopify.
🔹 Back Up Your WooCommerce Store
Before making any changes, back up all store data to prevent data loss if something goes wrong during migration.
How to Back Up Your WooCommerce Store?
🔹 Option 1: Use a Backup Plugin (Recommended)
- Duplicator – Saves a full site backup (products, pages, orders, settings).
- WP All Export – Allows exporting product, order, and customer data to CSV.
🔹 Option 2: Manually Download Data
- Products: Export from WooCommerce → Products → Export.

A WooCommerce Products Export Interface
- Orders & Customers: Export from WooCommerce → Orders → Export.

A WooCommerce Orders Export Interface
- Blog & Pages: Copy content manually or use WordPress XML export.

A WooCommerce Content Export Interface
💡Expert Tip: If you use WooCommerce Subscriptions or Memberships, make sure to export recurring payments separately, as Shopify does not support subscriptions natively.
🔹 Choose the Right Shopify Plan
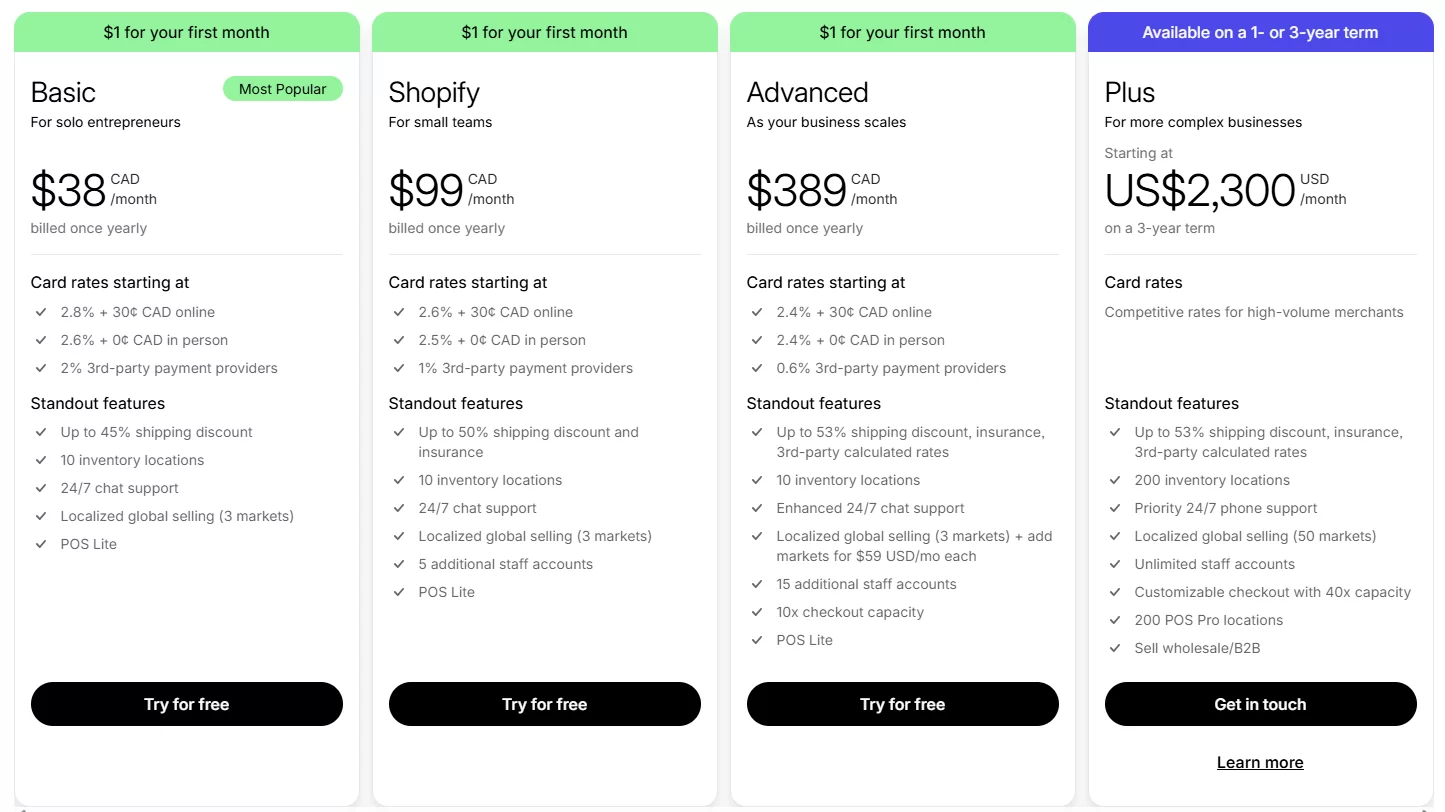
Shopify offers different pricing plans depending on your store’s size and features. Picking the right plan from the start ensures you have the tools you need without unnecessary expenses.
Shopify Pricing Plans Overview
- Shopify Starter ($5/month) – Good for selling on social media (not a full eCommerce store).
- Basic Shopify ($39/month) –Ideal for small to medium stores, includes essential eCommerce features.
- Shopify ($105/month): This service is recommended for growing businesses. It includes detailed reports and better shipping rates.
- Advanced Shopify ($399/month) – Best for large stores, offers lower transaction fees and custom reporting.
- Shopify Plus (Enterprise-Level) – Custom pricing for high-volume businesses with advanced automation.

Source- https://www.shopify.com/pricing
Which Shopify Plan Should You Choose?
- For small businesses: Basic Shopify is a great starting point.
- For scaling stores: The Shopify or Advanced plan offers better reporting and shipping discounts.
- For large enterprises: Shopify Plus provides customizable checkout and automation.
💡Expert Tip: Use Shopify’s free trial before committing to a plan—this allows you to test themes, explore settings, and set up your store without being charged immediately
Step 2. Setting Up Your Shopify Store Before Migration
Before transferring data from WooCommerce to Shopify, you need to set up your Shopify store correctly to prevent migration issues and ensure everything runs smoothly post-migration.
Proper setup ensures a functional, well-structured Shopify store ready for migration.
🔹 Create a Shopify Account & Choose a Theme
Your first step in the WooCommerce to Shopify Migration Checklist is to sign up for Shopify and choose a theme that matches your brand.
1. Sign Up for Shopify
- Go to Shopify.com and start a free trial.
- Enter your store name (this will be your temporary Shopify domain, e.g., yourstore.myshopify.com).
- Complete the basic store setup (currency, time zone, business details).
2. Choose a Shopify Theme
A well-designed theme enhances user experience and conversions. Shopify provides free and paid themes that are mobile-friendly and optimized for sales.
🔹 Where to Find Shopify Themes?
- Browse Shopify Theme Store for pre-built designs.
- Explore third-party themes on ThemeForest or Out of the Sandbox.
🔹 Why Choose a Shopify 2.0 Theme?
- Better Customization – Drag-and-drop sections without coding.
- Faster Performance – Improved loading speeds for SEO.
- Enhanced Flexibility – Custom templates for different products & pages.

3. Customize Your Theme
- In Shopify admin, go to Online Store → Themes.
- Click Customize to edit colors, fonts, and layout.
- Preview your store on desktop and mobile before migration.
💡Expert Tip: Choose a theme from Shopify Theme Store for unlimited free trials, lifetime updates, and superior quality over third-party themes.
🔹Set Up Payment & Shipping Options
Next, configure payment gateways and shipping settings to ensure customers can make purchases smoothly after migration.
1. Configure Payment Gateways
- In Shopify admin, go to Settings → Payments.
- Choose a payment provider (Shopify Payments, PayPal, Stripe, etc.).
- If using Shopify Payments, you can avoid extra transaction fees.
🔹 Popular Payment Options in Shopify:
- Better Customization – Drag-and-drop sections without coding.
- Faster Performance – Improved loading speeds for SEO.
- Enhanced Flexibility – Custom templates for different products & pages.

Shopify Payment Gateway Settings Interface
💡Expert Tip: Choose Shopify Payments to avoid extra transaction fees and streamline payment processing directly within Shopify.
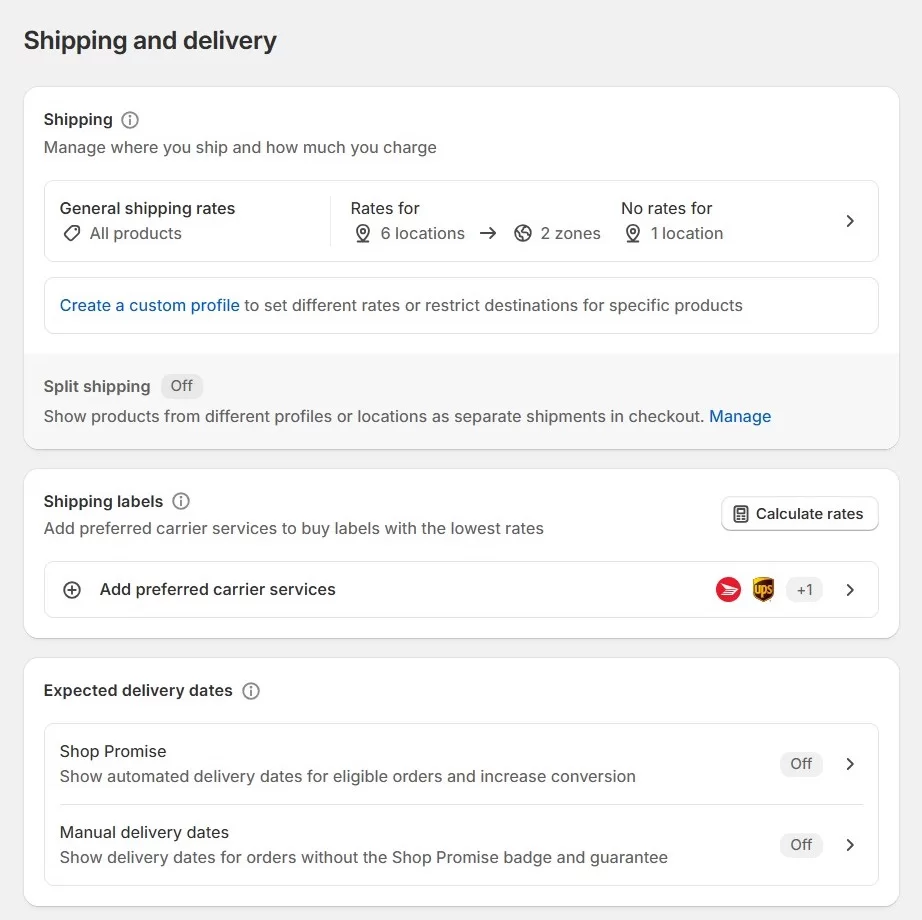
2. Set Up Shipping Rates & Tax Rules
- Go to Settings → Shipping and Delivery.
- Configure flat-rate shipping, free shipping, or carrier-calculated rates.
- Set tax rules based on your business location and international sales.
🚚 Common Shipping Options:
- Flat-Rate Shipping – Simple pricing for all orders.
- Weight-Based Shipping – Charges based on product weight.
- Carrier-Calculated Rates – Real-time rates from UPS, FedEx, DHL, etc.

Shopify’s Shipping and Delivery Settings Interface
💡Mistake to Avoid: Forgetting to enable tax settings—Shopify doesn’t apply taxes automatically, so you need to set up tax rules based on your country.
🔹 Install Shopify Apps to Replace WooCommerce Plugins
Shopify doesn’t use WordPress plugins, so you’ll need Shopify apps to replicate WooCommerce functionalities.
Essential Shopify Apps for Your Store
- SEO Optimization Apps
- Smart SEO – Automates meta tags, alt text, and JSON-LD for better search rankings.
- Plug in SEO – Detects SEO issues and suggests fixes.
- Email Marketing Apps
- Klaviyo – Advanced email automation, great for abandoned cart recovery.
- Omnisend – Email + SMS marketing in one platform.
- Product Reviews & UGC (User-Generated Content)
- Judge.me – Allows customers to leave product reviews.
- Loox – Adds photo reviews for social proof.
- Additional Helpful Apps
- PageFly – Drag-and-drop page builder for custom landing pages.
- ReConvert – Post-purchase upsells to boost sales.
💡Expert Tip: Don’t install too many apps initially—each app adds to your monthly cost and may slow down your store. Start with essential apps and add more as needed.
Step 3. Migrating Data from WooCommerce to Shopify
Migrating your store data is the most essential and complex part of moving from WooCommerce to Shopify. Your products, customers, orders, blog posts, and other store content need to be transferred accurately to ensure your Shopify store is fully functional after migration.
There are two main approaches to WooCommerce to Shopify data migration
- Manual CSV import/export
- Automated migration using third-party tools.
The right approach depends on your store’s size, complexity, and how much customization you need.
🔹 Option 1: Manual Data Migration (CSV Import/Export)
If your store has a manageable number of products, customers, and orders, you can manually export data from WooCommerce and import it into Shopify using CSV files. This method requires careful data formatting, but it is a cost-effective way to migrate your store without using paid tools.
Step-by-Step Guide for Manual Data Migration
i. Export Products from WooCommerce
- In your WooCommerce admin panel, go to Products → All Products.
- Click on Export and select the fields you want to export (e.g., product name, SKU, price, stock status, categories, descriptions, and images).
- Download the CSV file.
ii. Format the CSV File for Shopify
- Shopify has a specific format for CSV imports. Download Shopify’s product CSV template from the Shopify Help Center.
- Open the WooCommerce CSV file and map the column names to match Shopify’s format.
- Check for inconsistencies like missing images, unformatted prices, or duplicate SKUs.
iii. Import Products into Shopify
- In Shopify admin, go to Products → Import.
- Upload the formatted CSV file.
- Review the preview and click Import.
💡Mistake to Avoid:
- Forgetting to match WooCommerce product fields with Shopify fields—incorrect mapping can cause missing data.
- Not checking for WooCommerce product variations—Shopify handles them differently, so they might not import correctly.
iv. Export & Import Customer Data
Customers are essential for your business, and you need to migrate them correctly while complying with data privacy regulations (GDPR, CCPA).
How to Migrate Customers from WooCommerce to Shopify
- In WooCommerce, go to Users → Export and choose the customer role.
- Export customer names, emails, addresses, and order history in CSV format.
- Shopify allows you to import customer lists, but passwords will not be transferred due to encryption. Customers will need to reset their passwords after migration.
💡Expert Tip: Before migration, email customers about the move and inform them to reset their passwords on the new Shopify store.
v. Export & Import Orders (Optional but Recommended)
Shopify does not allow direct order import via CSV, so if you want to preserve past orders, you’ll need a third-party app like Matrixify or Excelify.
- Export orders from WooCommerce Orders → Export.
- Convert the data to Shopify’s format (using an app like Matrixify).
- Import orders into Shopify using the app.
Option 2: Automated Migration Using Apps
Manual migration can be time-consuming and prone to errors if you have a large store with thousands of products, customers, and orders. This is where automated migration tools come in. These tools transfer entire stores quickly and accurately while minimizing downtime.
Top Apps for WooCommerce to Shopify Migration
- LitExtension – The Most Popular WooCommerce to Shopify Migration Tool
- Fully automated migration with real-time updates.
- Transfers products, categories, customers, orders, and even SEO settings.
- Supports migrating customer passwords (customers can log in without resetting passwords).
- Provides a free demo migration before you commit.
- Cart2Cart – One-Click Migration with 24/7 Support
- Fast and efficient WooCommerce to Shopify transfer with zero downtime.
- Migrates all products, customer data, orders, and reviews.
- Allows real-time migration tracking so you can see progress.
- Offers 24/7 customer support in case of issues.
- Matrixify – Advanced Control Over CSV Import/Export
- Best for custom migrations and bulk editing.
- Allows Shopify order imports, which Shopify doesn’t support natively.
- Ideal for stores with complex data structures needing extra customization.
💡Expert Tip:
- Manual migration may work if you have a small store (under 1000 products).
- Automated migration is the best choice if you have a large store (1000+ products, orders, and customers).
Step 4: SEO & Redirects – Preserving Search Rankings After Migration
When migrating from WooCommerce to Shopify, SEO (Search Engine Optimization) is one of the most critical aspects to consider. If not handled correctly, your organic traffic, rankings, and search engine visibility could take a major hit.
This step will ensure that your existing WooCommerce URLs are properly redirected, Google reindexes your site, and your internal links are updated. So you don’t lose valuable search rankings or customer trust.
🔹Set Up 301 Redirects to Maintain SEO Structure
When switching from WooCommerce to Shopify, one of the biggest risks is that your URL structure will change. WooCommerce follows a category-based URL format, whereas Shopify uses collections instead of categories. This means that many of your URLs will no longer exist in the same form.
What is a 301 Redirect, and Why is it Important?
A 301 redirect is a permanent redirect from an old URL (WooCommerce) to a new one (Shopify). Setting up proper 301 redirects ensures that users and search engines are automatically sent to the correct page on your new Shopify store.
Without 301 redirects:
- Your old pages will lead to 404 errors, negatively impacting user experience.
- Google will see broken links, hurting your SEO rankings.
- Your backlinks pointing to WooCommerce pages may become useless.
Step-by-Step Guide: Setting Up 301 Redirects in Shopify
1. Identify Old WooCommerce URLs That Need Redirecting
- Export a list of all your existing WooCommerce URLs.
- Use Yoast SEO plugin or Google Search Console to get a sitemap of indexed URLs.
- Manually collect important URLs such as homepage, product, category, blog, and landing pages.
2. Map Old WooCommerce URLs to New Shopify URLs
- Since Shopify doesn’t use categories (e.g., /product-category/shoes), you must redirect category URLs to Shopify collections.
- Example URL changes:
- WooCommerce: yourstore.com/product-category/shoes
- Shopify: yourstore.com/collections/shoes
- Products URLs may also change:
- WooCommerce: yourstore.com/product/nike-air-max
- Shopify: yourstore.com/products/nike-air-max
- Blog URLs may change if Shopify’s structure differs:
- WooCommerce: yourstore.com/blog/2023/06/best-sneakers
- Shopify: yourstore.com/blogs/news/best-sneakers
3. Create 301 Redirects in Shopify
There are two ways to set up 301 redirects in Shopify:
- Method 1: Manually Add Redirects in Shopify (Suitable for Small Stores)
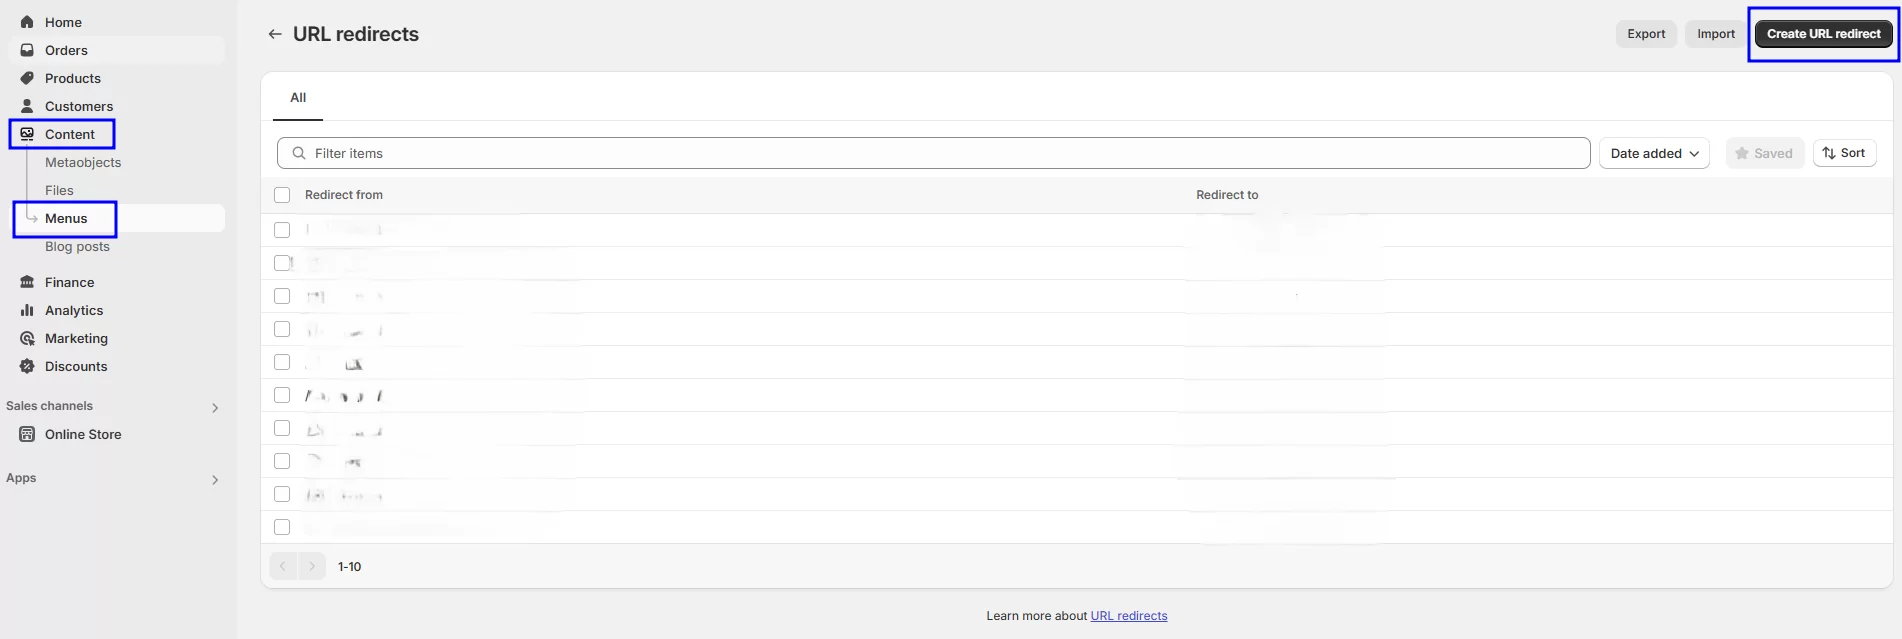
- In your Shopify admin panel, go to Online Store → Content → Menu → URL Redirects.
- Click Create URL Redirect.
- In the Old URL field, enter the WooCommerce URL (without your domain).
- In the New URL field, enter the corresponding Shopify URL.
- Click Save redirect.
- Repeat this for all important pages.

Shopify’s URL redirect settings Interface
💡Best for: Manual redirects method is best for small stores with a limited number of pages to redirect.
- Method 2: Use a Shopify Redirect App (Recommended for Large Stores)
If you have hundreds or thousands of URLs to redirect, doing it manually is not feasible. Instead, use a Shopify app to automate the process:
- SEO Manager – Automatically sets up 301 redirects and tracks broken links.
- Easy Redirects – Allows bulk import of old URLs via CSV.
💡Expert Tip: After setting up redirects, test them with a redirect checker tool like Redirect Checker to verify they are working correctly.
🔹 Submit Your New Shopify Website Sitemap to Google
Once you’ve set up your new Shopify store, you need to tell Google about the changes so it can crawl and index your Shopify URLs instead of your old WooCommerce URLs.
Step-by-Step Guide to Submitting Your Sitemap
1. Find Your Shopify Sitemap
Shopify automatically generates a sitemap for your store. You can find it at: yourstore.com/sitemap.xml


